

How to use the VBA Code in Excel to Combine Multiple Workbooks into a Single Workbook?
Combine Multiple Workbooks into a Single Workbook with VBA Code is useful when you must compile multiple workbooks into one single workbook so that you can carry out your tasks. The only option available is to select each single sheet and move it to one master workbook which will take considerable time.
In this post, I will explain to you how to use VBA Code in Macro, provided in the following example, and use it to combine separate workbooks into a single workbook. This VBA code will also rename each Workbook Sheet with the corresponding Workbook name for us to easily identify from the Master Worksheet, from which File a sheet belongs to.
Practical applications of Combine Multiple Workbooks into a Single Workbook
Example
Suppose you have a monthly payroll data and you receive daily attendance sheet in separate Excel workbooks. In our example we want to combine four similar workbooks into a single workbook.
Step 1: Save all the separate workbooks that are to be combined into one single folder.
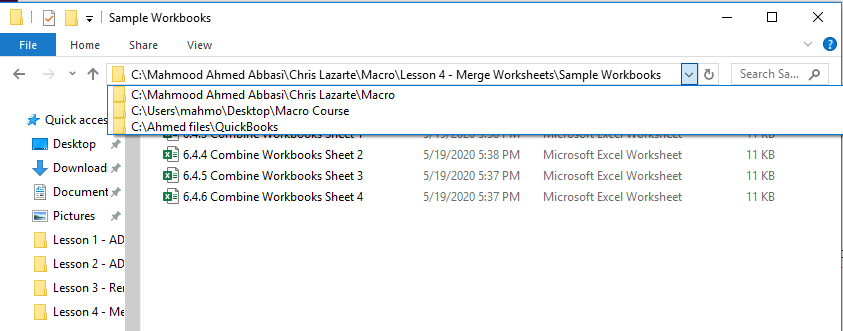
Step 2: Save the path of the selected folder as we will need it when entering the VBA Code. Go to the folder where the files are saved and click the drop-down button and the name of the path file will appear. Copy and save it to be used later. In our example, the path name is “C:\Mahmood Ahmed Abbasi\Chris Lazarte\Macro\Lesson 4 – Merge Worksheets\Sample Workbooks”
Step 3: Open an excel workbook that you want to create as Master Workbook and save it as Macro Enabled Workbook.
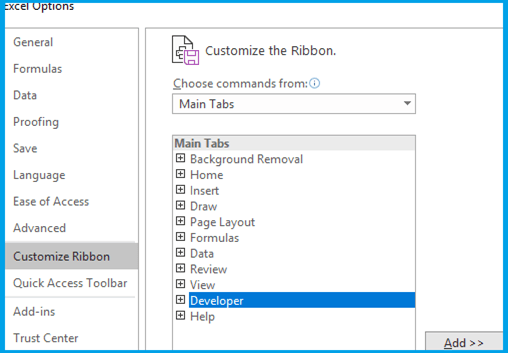
Step 4: Enable Developer Tab in your workbook. Go to File>Options>Customize Ribbon>From Drop Down Select Main Tab>Developer Tab>Add>OK
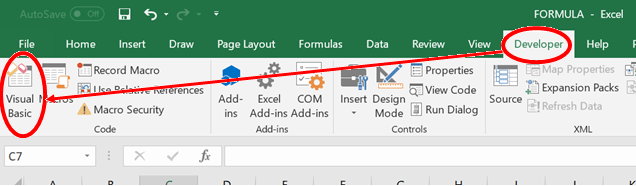
Step 5: Go to Developer Tab>Visual Basic
Step 6: Go to Insert Tab>Module.

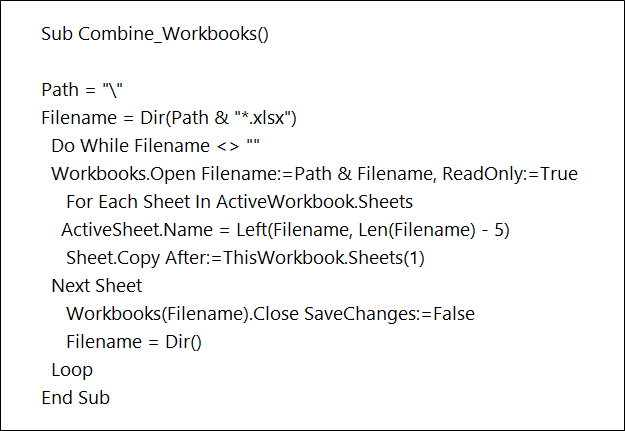
Step 7: Copy the text below and Paste it on Macro Visual Basic Module.
Step 8: Edit the first portion of the VBA code by inputting the name of the folder path saved in step 2.

Step 9: Press F5 or the Play button to run the task and combine workbooks as shown below.

Explanation of the VBA Code
The VBA code shown above is further explained below for the users to understand how the VBA Syntax works to combine workbooks in a single workbook.
Path = “\”
The first layer in the code is the instruction to Excel to locate the path of the file that we want to further work on. This can be either in the same workbook or stored in an external workbook file. In our example, we had the files saved in a separate folder and we searched for the path name in the drop down option of that specific folder. Important part to note is that in the end of the path name, there should always be a back slash before the closing double quotation mark.
Filename = Dir(Path & “*.xlsx”)
The second layer is instructing Excel to select all the files in the path name selected with the .xlsx extension.
Do While Filename <> “”
The third layer is the start of “Do While” instruction. It is a series of instructions to excel to perform a task based on a criteria and then it is closed with a “Loop” instruction. This means that we are instructing excel to perform a specific series of tasks and continue to perform it until the instruction given are no longer fulfilled. We need this in our example as we will now instruct excel to open the workbooks, rename them and then to move to our master workbook. We want the same task to be repeated till all the files in the workbook have successfully opened, sheet name replaced and then moved to the master workbook.
Workbooks.Open Filename:=Path & Filename, ReadOnly:=True
The fourth layer is instructing Excel to open all Workbooks in the path with read only instructions.
For Each Sheet In ActiveWorkbook.Sheets
The fifth layer is instructing Excel to select all the worksheets of the Workbook that is opened in previous code layer.
ActiveSheet.Name = Left(Filename, Len(Filename) – 5)
The sixth layer is instructing Excel to rename the Active sheets with their corresponding file name. It uses the Left Function to extract the filename. Please note that if we do not use the Left function here, then the sheet names will be saved with the file name but will also contain “.xlsx” extension name at the end because the file names are stored with their relevant file extensions. Therefore we are using the Left function to select only the file name without its extension. The function will work as follows. The left function will extract number of characters in the file name beginning with the left most character and continue till the number of characters specified. Instead of specifying the number of characters, we have replaced it with Length function which will calculate the length of the file name. From there we will deduct five characters that represent the extension name and we will be left with the file name without its extension.
For Each Sheet In ActiveWorkbook.Sheets
The seventh layer is now instructing excel to copy the sheet to the new master workbook. This is equivalent to the move or copy function.
Next Sheet
The eight layer is instructing Excel to select the next sheet if there are multiple worksheets in a workbook.
Workbooks(Filename).Close SaveChanges:=False
The ninth layer is instructing Excel to close the workbook without saving changes. If we do not select the save changes option, it will continuously prompt us whether we want to save the file or not. You can also set it to True if you want to save changes in the original file as well.
Filename = Dir()
The tenth layer is an important instruction because we want to make sure that when we run the code on the entire folder, the same file is not selected again and the code ends eventually when all the workbooks are combined. As defined earlier, we selected the directory of the files by input of the path name of the folder. Here we will again un define the file location so that it is not opened again.
Loop
The last layer is how all the Do While arguments are ended with so that we do not have to repeat the code and instruct Excel to automatically move on to the next file and carry out the same task.
Now that we understand how the Syntax in the code works, we can use it to easily combine multiple workbooks into one single workbook.
I hope that helps. Please leave a comment below with any questions or suggestions. For more in-depth Excel training, checkout our Ultimate Excel Training Course here. Thank you!


0 Comments